Website by 
Resources
Lighting Design for Kitchen Remodels: The Layers That Make the Difference

Walk into a kitchen remodel that feels off and can't quite say why? Nine times out of ten, it's the lighting. The cabinets are beautiful, the quartz is flawless — but a single ceiling fixture is casting your own shadow over the cutting board, the corners are dim, and the whole room falls flat by 5 p.m.
In Rochester, lighting design matters even more than it does in sunnier markets. Western New York ranks among the cloudiest regions in the country, and from November through March, many of us leave for work in the dark and come home in the dark. Your kitchen lighting isn't an accent here — for half the year, it is the light in the heart of your home.
The good news: great kitchen lighting isn't about spending more. It's about layering — putting the right kind of light in the right place for the right job. Here's how professional designers think about it, and how to bake it into your remodel from day one.
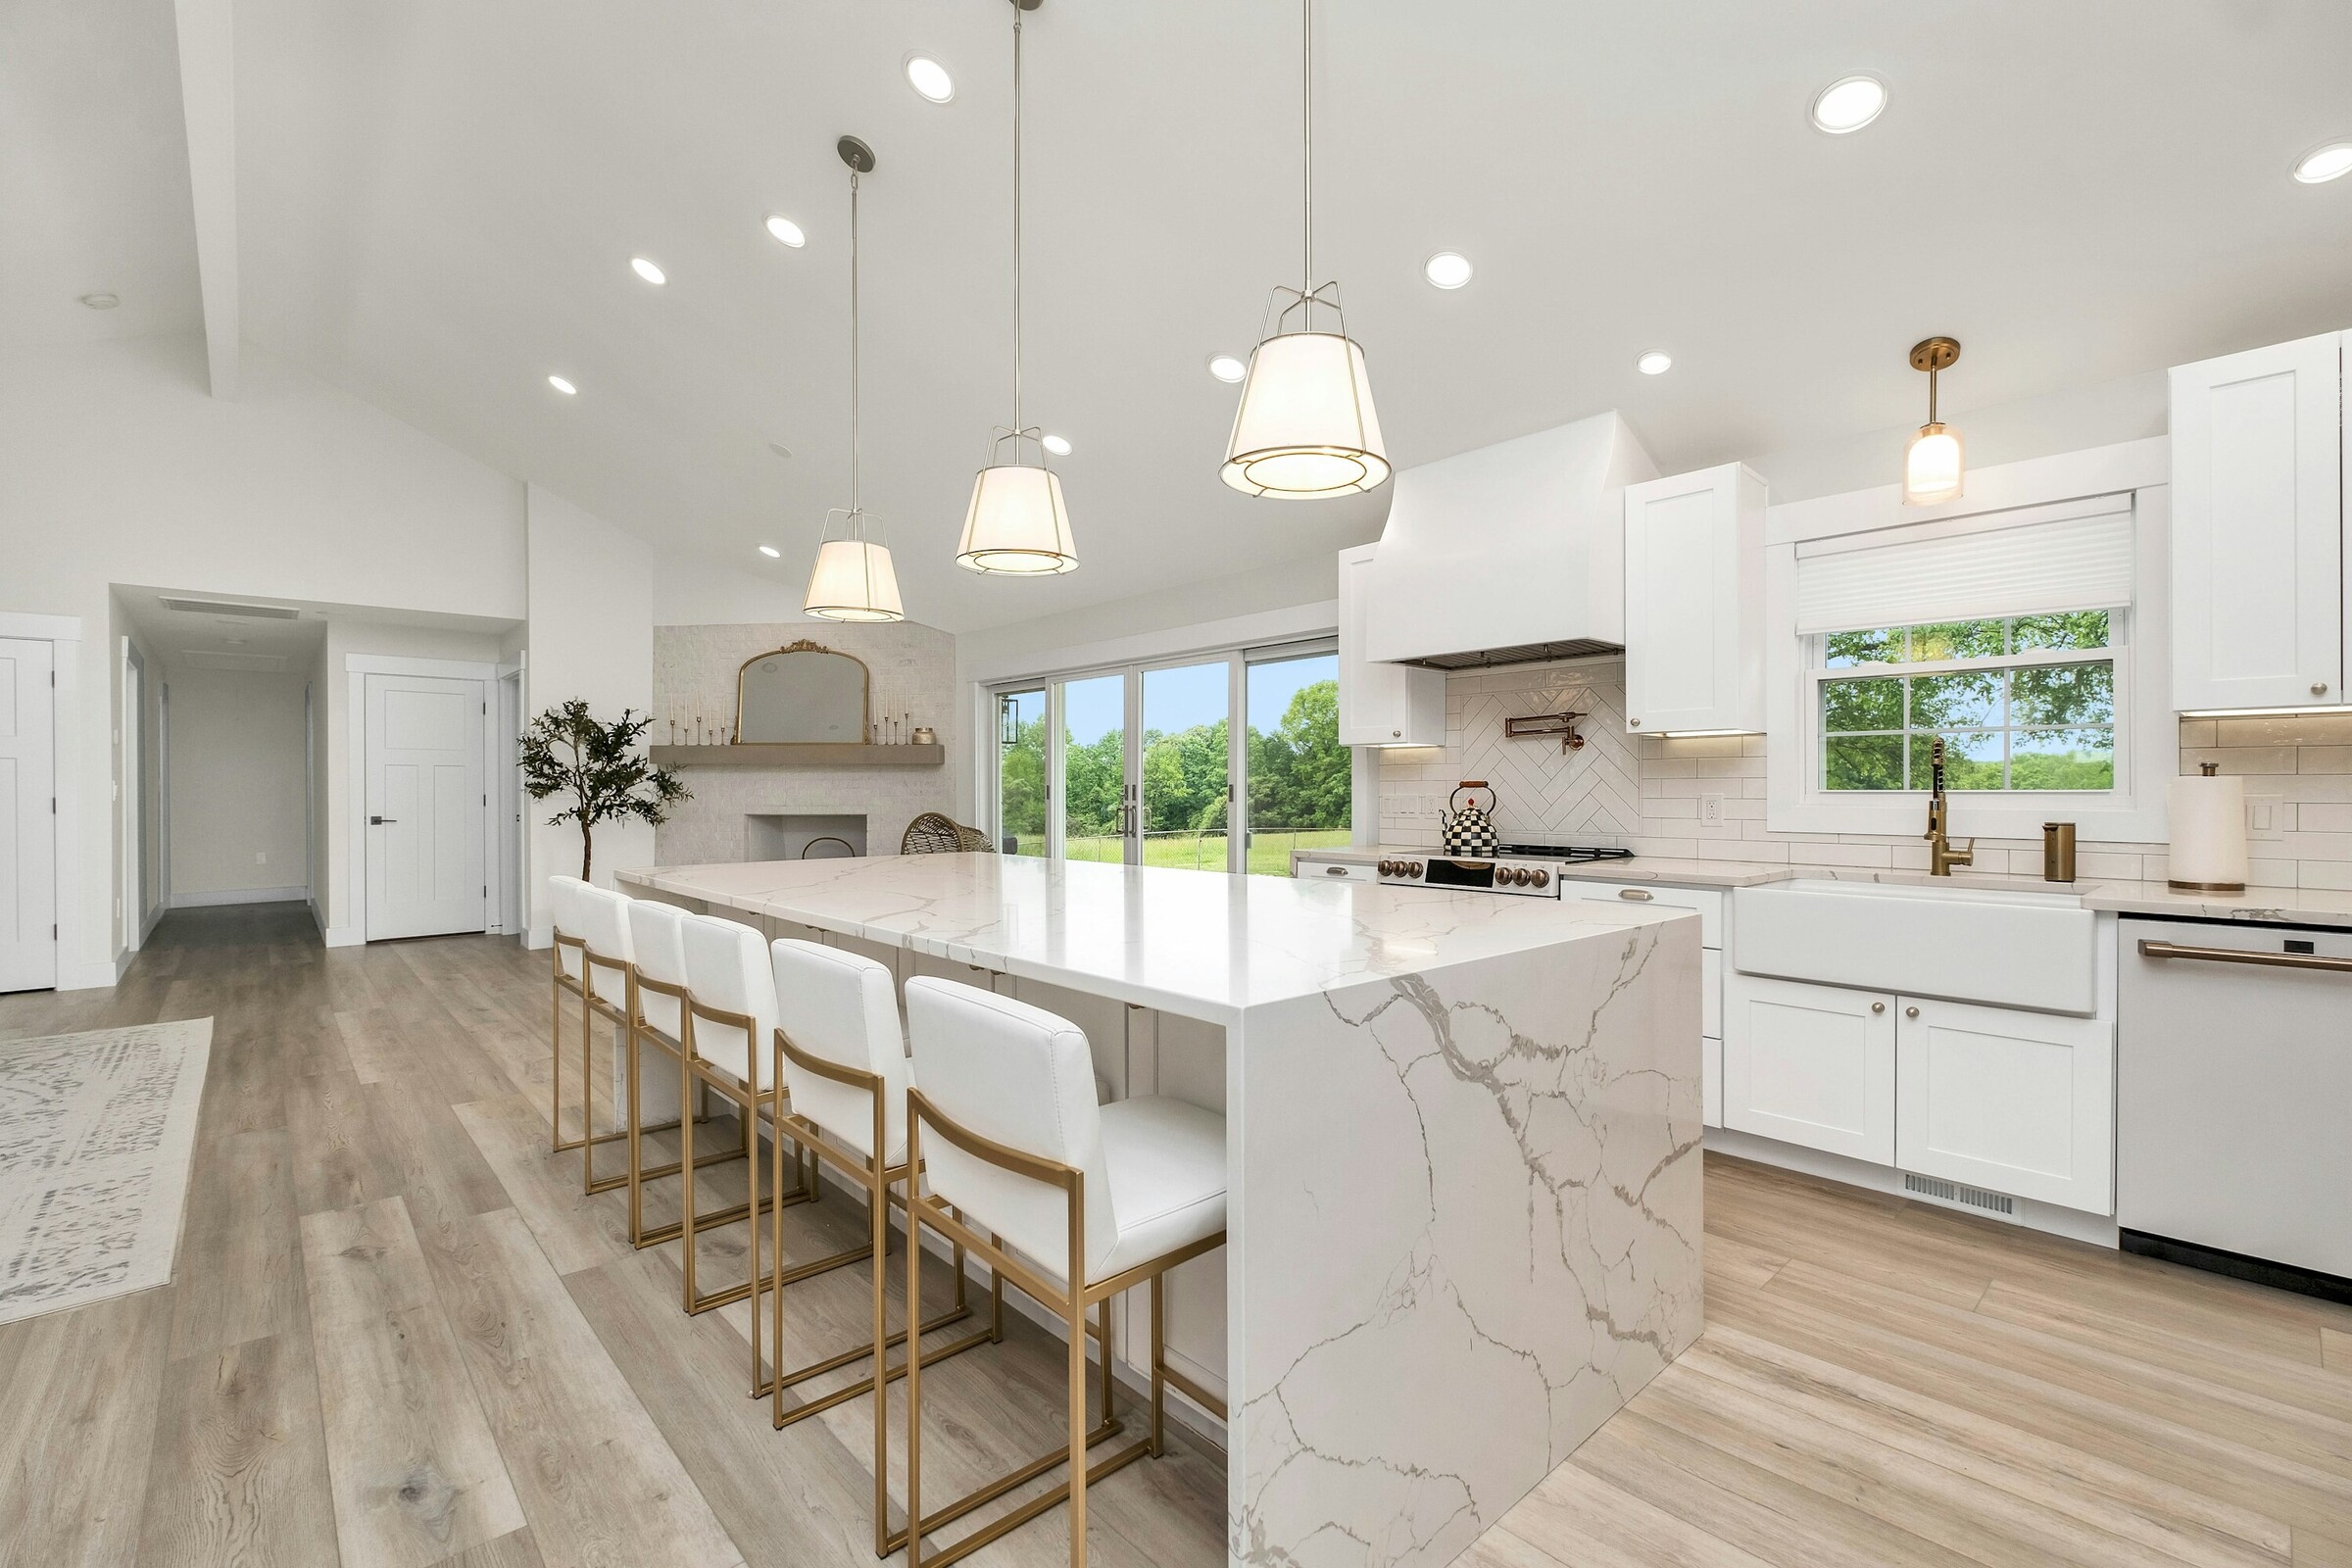
The Four Layers of Kitchen Lighting
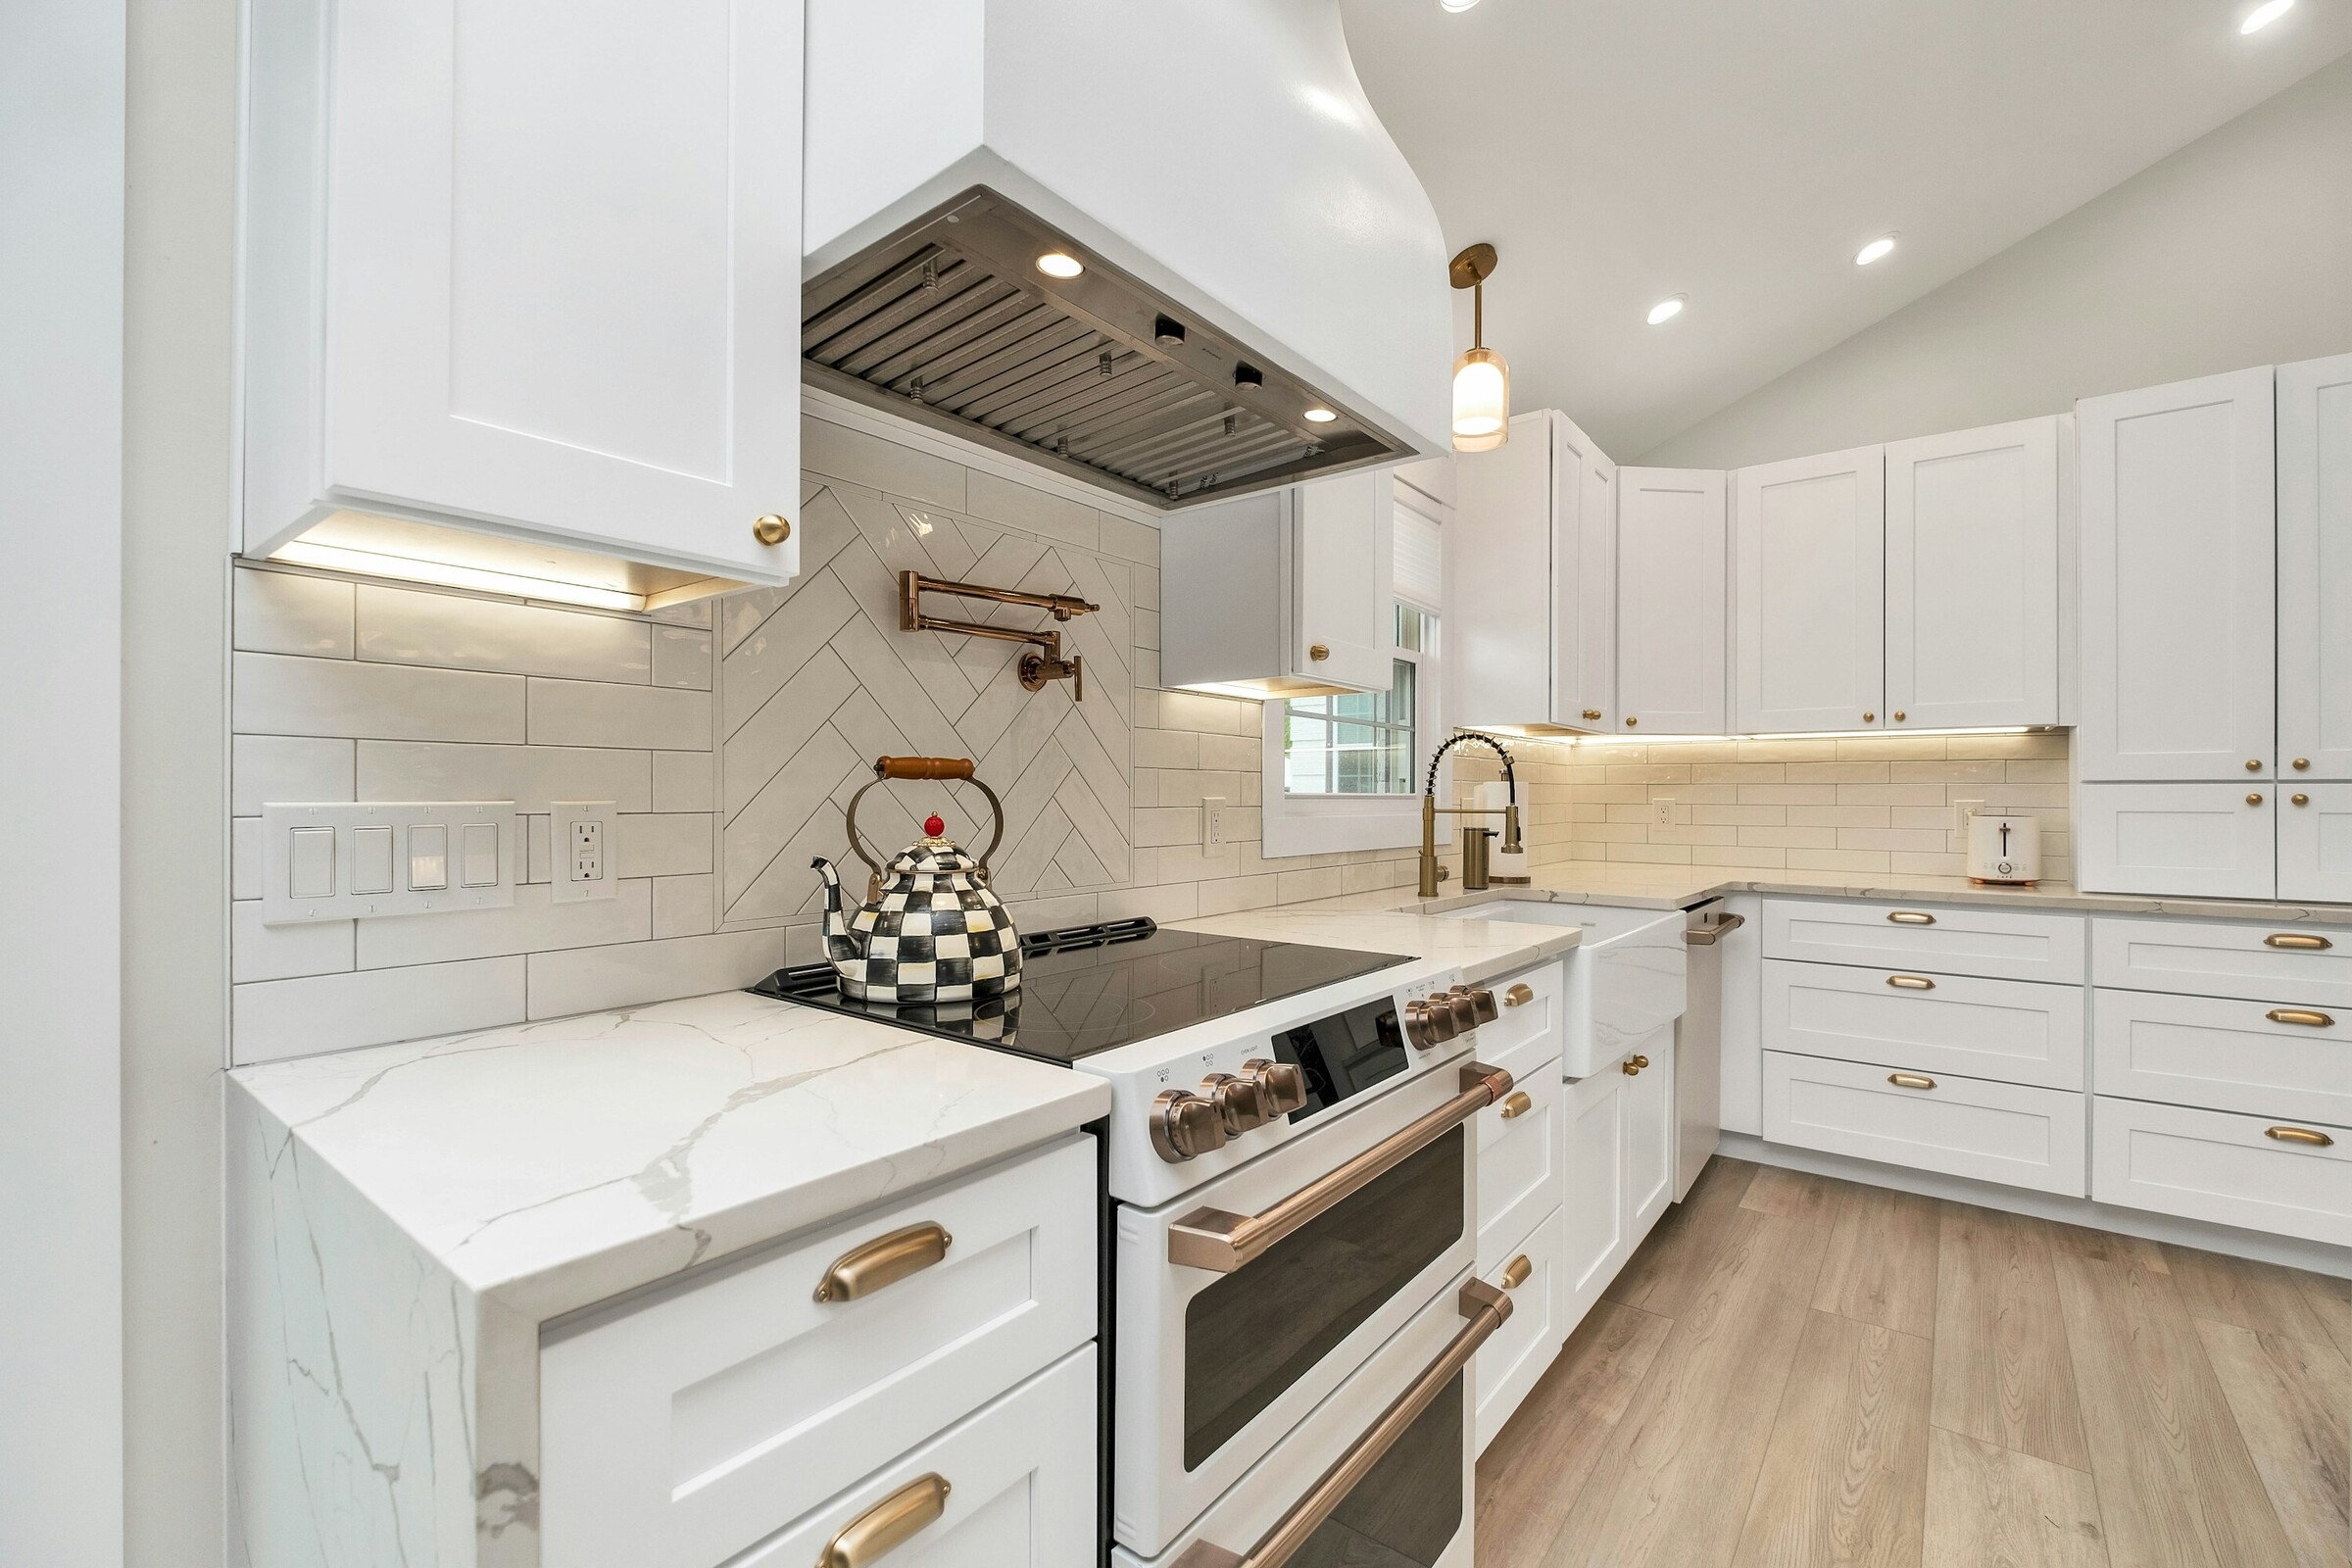
Designers break kitchen lighting into four layers that work together. Miss one and the room feels incomplete; nail all four and the kitchen flatters everything in it, including you.
- Ambient: The general fill light — recessed cans, flush mounts — that lets you move through the room
- Task: Focused light on work surfaces — under-cabinet strips, pendants over the island, a light over the sink
- Accent: Light that adds depth — inside glass cabinets, above crown molding, on open shelving
- Decorative: Fixtures as jewelry — the statement pendants and chandelier that carry the style
The most common mistake in DIY lighting plans? Trying to make one layer do everything. A grid of recessed cans gives you ambient light and nothing else — bright, flat, and shadowy at the counters where you actually work.
Ambient Light: Get the Foundation Right
Recessed LED fixtures remain the workhorse, but placement beats quantity. A few principles that come up in nearly every Rochester kitchen we design:
- Position cans 24–30 inches from the wall so light washes the counter, not the floor behind you
- Space fixtures based on ceiling height — roughly 4–6 feet apart in most 8–9 foot kitchens
- Choose slim wafer LEDs where joist bays are tight, common in older Monroe County homes
- Put every ambient zone on a dimmer — full power for cleaning, low glow for evenings
In older Rochester houses with 8-foot ceilings and shallow framing, fixture selection matters doubly: low-profile LEDs avoid hacking up structure, and insulation-contact-rated fixtures keep your attic air-sealing intact — a real energy issue when it's 10 degrees outside.
Task Lighting: Where Dinner Actually Gets Made
Under-Cabinet Lighting Is Non-Negotiable
If you add only one thing to your lighting plan, make it under-cabinet LED strips. They eliminate the shadow your own body casts on the counter, and they double as the perfect evening "nightlight" level. Hardwired strips installed during a remodel look seamless — no cords, no plugs — and add modestly to the project, typically $40–$100 per linear foot installed depending on the system.
Pendants Over the Island
Pendants are task and decorative lighting in one. The working rules of thumb:
- Hang them 30–36 inches above the countertop
- Two pendants for islands up to about 6 feet; three for longer runs
- Keep roughly 24–30 inches between pendants
- Pick shades that direct some light down onto the surface, not just sideways glow
Don't Forget the Sink and Range
A dedicated fixture or pair of cans over the sink, plus a quality range hood with built-in lighting, completes the task triangle. Washing dishes in your own shadow gets old fast.
Accent and Decorative Layers: The Difference-Makers
This is where a kitchen goes from functional to magazine-worthy:
- Glass-cabinet interior lighting turns upper cabinets into a display
- Open-shelf LED strips make everyday dishes look curated
- Above-cabinet uplighting adds ceiling height and evening ambiance
- Toe-kick lighting floats the cabinetry and guides midnight-snack missions
- A statement fixture over the table or nook anchors the room's personality
Accent layers draw little power with LEDs and cost relatively little when wired during a remodel — but added afterward, they mean opening up finished walls. This is exactly why lighting belongs in the design phase, not the punch list.
Color Temperature: The Detail Everyone Gets Wrong
Ever bought an LED bulb that made your kitchen feel like a gas station? That's color temperature, measured in Kelvin:
- 2700K: Warm, cozy, incandescent-like — great for pendants and dining areas
- 3000K: The kitchen sweet spot — clean and inviting, flattering to wood tones and skin
- 3500K–4000K: Crisper task light; fine under cabinets, harsh as whole-room light
- 5000K+: Leave it in the garage
Two rules: keep temperatures consistent within each layer, and look for a high CRI (90+) rating so food, finishes, and faces render in true color. During our long gray season, many Rochester homeowners also love tunable or warm-dim fixtures that shift cooler for bright winter mornings and warmer for evenings.
Planning a kitchen project and not sure how many circuits, switches, and layers it needs? Connect with Ember Works and our in-house designers will build a complete lighting plan into your kitchen design — before the drywall goes up.
Controls: Smart Switching Beats Smart Bulbs
The final layer is control. A well-designed kitchen separates lighting into zones — ambient, island, under-cabinet, accents — each switched and dimmed independently. From there:
- Dimmers everywhere. They're inexpensive during construction and transform how the room lives
- Smart switches (rather than smart bulbs) give you scenes like "cooking," "dinner," and "evening" at one tap
- Three- and four-way switching at every kitchen entrance — a detail older homes almost never have
- Motion or timer control for toe-kick and pantry lighting
One practical note: new circuits, switch locations, and fixture wiring are electrical work that's typically permitted and inspected in Monroe County municipalities. It's handled as a matter of course within a professionally managed remodel.
What Lighting Adds to a Kitchen Budget
As typical ranges for the Rochester market within a full kitchen remodel:
- $2,000–$4,500 for a solid recessed-plus-under-cabinet package with dimming
- $4,500–$9,000 for full four-layer designs with pendants, accents, and zoned controls
- $9,000+ when statement fixtures and whole-room smart scenes enter the picture
Relative to the total cost of a kitchen remodel, lighting is one of the highest-impact dollars you'll spend — it's the layer you experience every single hour you're in the room.
Designed and Built as One Plan
Lighting touches design, electrical, cabinetry, and ceiling structure all at once — which is why it falls through the cracks when those pieces are handled by separate parties. As a true design-build firm, Ember Works plans your lighting alongside your cabinet elevations and electrical rough-in from the first drawing, and our build team — with 60+ years of combined hands-on experience in Rochester, Monroe County, and Western New York homes — executes it without the "oops, that wall's closed" surprises.
Let's Brighten the Heart of Your Home
Through a Rochester winter, a beautifully lit kitchen isn't a luxury — it's daily quality of life. If your kitchen remodel is on the horizon, let's design the light right into it.
Ignite Your Home's Potential with Ember Works!
Call us today: 585-465-1674
Contact Us: www.emberworksroc.com/contact-us
‹ Back
Recent Posts
-
The Powder Room: Big Style in Your Home's Smallest Room
July 25, 2026
-
-
-
Kitchen Flooring That Survives Rochester Winters
July 14, 2026
-